Picture Postcard Workflow: Why I don't like the False Profile technique
Introduction
Somewhere in the middle of the Picture Postcard Workflow there is a step which is often referred to as the "False Profile/Multiply technique". The documentation of this step is not very consistent.
- In the Workflow Summary of the book, the step is listed as "False Profile > Multiply > Blur Mask". A related action called "CMYK Detour" is listed as a separate step.
- In the PPW Final Version overview elsewhere in the book, it is just one step called "Consider lighten and multiply".
- In the PPW Overview of the panel documentation, it is also one step, but with three variants: "Straight Multiply", "Multiplication with False Profile" and "The CMYK Detour".
I believe that the Multiply with and without False Profile are really two manifestations of one and the same procedure. The CMYK Detour however is only technically related but serves a different goal and thus should be a different step.
In this article I will focus on the False Profile/Multiply technique, go through an example and explain why I don't like it. It is my intention to write another article where I propose a different way of working with similar results. The current article does not cover the CMYK Detour step.
An Italian street
Purpose
So when can we apply this False Profile / Multiply procedure (henceforward referred to as FP/M)? The simple answer to this question is: when an image has clearly distinctive dark and light areas, and not much in-between. A photograph taken in bright sunlight is the obvious example, but other situations certainly exist. The human eye, with its ability to cover huge dynamic range, perceives less contrast in such situations than the camera does. Hence, we may consider bringing the dark and light parts closer to each other. Simply said: make dark areas lighter, light areas darker or both.
Wait, aren't the hammers meant to do this very thing? Well, yes and no. Yes, the hammers also darken highlights and lighten shadows, but they do it with a different purpose: to create more detail in highlights and/or shadows. In the context of the workflow, this is an important difference; the two techniques should not be confused.
For now, our goal is to just bring an image's light and dark areas closer together.
Theory
Given the somewhat confusing documentation for the FP/M step, the basic procedure is surprisingly simple.
- We lighten an image by assigning a false RGB profile to it (in fact, a lower gamma value)
- Next, we darken the image's highlights by multiplying it with itself, masked by a blurred version of one of its channels
All right, a quick explanation. By "RGB profile" we mean something like sRGB or ProPhotoRGB. Every image's profile has an attribute called "gamma", a number that determines how light or how dark pixels must be interpreted. The same pixel will show lighter under gamma 1.0 than under gamma 2.0.
sRGB and AdobeRGB both have gamma 2.2 by default. This value however is not fixed and can be altered if one wishes to. Note, this does not change the pixel values themselves, but it changes how they are displayed by Photoshop (and other applications). Lowering the gamma makes an image look lighter, raising it darker. The more deviation from the starting value, the stronger the effect.
The second step above - multiplying the image with itself - darkens the image. It is the mask that ensures that only lighter parts of the image are darkened. Darker parts are masked out and thus remain lighter by the false profile step.
If the shadows are already light enough, then the fist step can be skipped. (I assume that, for similar reasons, the second step is optional as well, although the PPW documentation doesn't mention this explicitly.)
If you want to know more about all this, both the panel documentation and the Modern Color Workflow book cover the technical parts very well. For now, I will look at how all this works in a practical situation.
Example
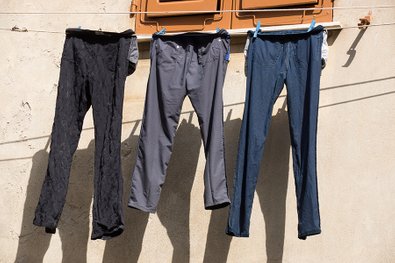
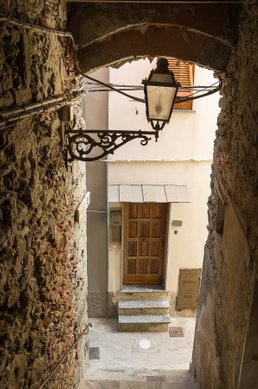
Figure 1. Original image
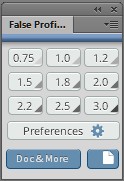
Figure 2
Have a look at figure 1. This is an example where the FP/M technique is applicable: light and dark parts clearly distinct. We don't need the extra detail in the wall or the trousers that the hammers would give. This is certainly not a product image of three trousers. It is a photo that tries to capture the mood of a quiet Mediterranean street. Wall and trousers play an equal role.
So off we go. We need both steps, so we start with assigning a false profile. The PPW panel has two buttons to perform this step: "1.4 gamma" and "1.0 gamma". If these are not appropriate for the task at hand, different values can be chosen from an external plug-in called "False profile" delivered by panel developer Giuliana Abbiati. See figure 2. More information about this plug-in can be found here: http://www.cs-extensions.com/products/falseprofile/
The two panel buttons 1.4 gamma and 1.0 gamma have the advantage that an extra Multiply layer is automatically created, to facilitate step 2. The buttons on the False Profile plug-in do not have this effect.
So why not try the 1.4 button? Right... see figure 3 for the result.
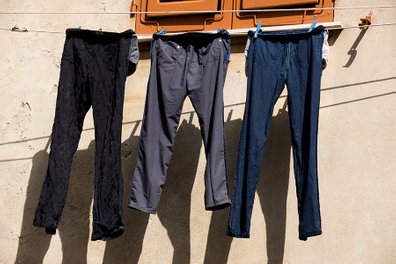
Figure 3. After applying the 1.4 gamma panel action
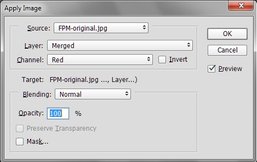
Figure 4. Apply Image
Clearly too dark, but we still have to create the mask. Any channel will do, but the one with the best distinction between dark and light is the preferred choice. In this case, we choose the Red of the merged layer.
For the record, here is the procedure.
- Click the mask of the upper layer (which is still white).
- From the menu, Image - Apply Image. Enter Layer: Merged. Channel: Red. Blending: Normal and Opacity: 100%. See figure 4.
- Finally, don't forget to blur the mask. With the focus still on the mask, menu: Filter - Blur - Gaussian Blur and enter a high number like 35.0.
See figure 5 for the result, next to the original.
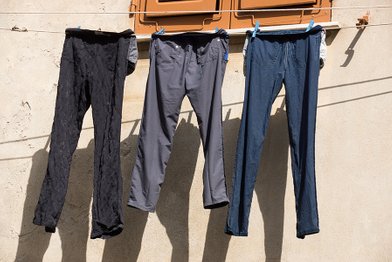
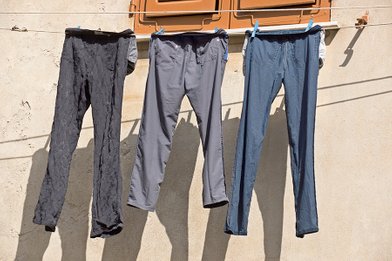
Figure 5. Original image and after processing the full procedure
Evaluation
I find the result so so. The trousers have lightened, but too much in my opinion. The wall has darkened, but... not enough. The whole image has become too light. In principle that's easy to correct, but before I do that, I note some clumsiness in the process so far.
When I judge the effect of any image enhancement, I prefer to switch to and from the original. Did my action do what I was after? In the current image, this is not possible, unless I undo all the steps done so far. The background layer is not the background layer that I started with. Assigning a different profile is not an effect that applies to a layer only, but it affects the whole image. The whole layer stack is interpreted with the new gamma. In our case, the background layer shows much lighter than what it was before I started the procedure.
A workaround for this problem would be to duplicate the image before applying the procedure, and comparing the result with that duplicate. That's fine, but it hinders an efficient execution of the workflow.
Another annoying side-effect of this procedure is that the histogram is misleading. A histogram shows the distribution of pixel values. It doesn't account for a non-standard gamma value against which the pixel values are interpreted. Judging the processed image, it is considerably lighter than the original. The histogram seems to tell a different story. This is logical but confusing at the same time. See figure 6 for a comparison.
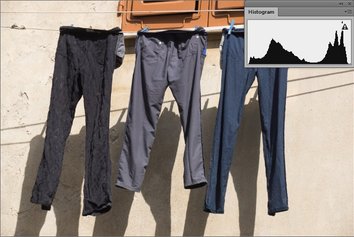
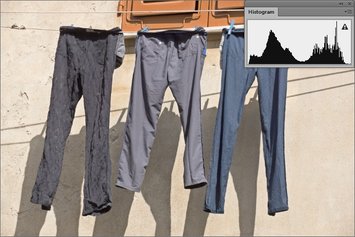
Figure 6. Comparing original and processed images with their histograms
Remember that the "assign profile" step of the background layer did not change pixel values. It only changed how these pixel values had to be interpreted. The "multiply" step darkened the image, mostly in the lighter areas. This does change pixel values, and thus shows in the histogram. The histogram seems to tell that the image has become darker, but in reality it hasn't.
This too can be fixed, namely by converting back to the default gamma of 2.2 (mind you, not assigning!). Here goes:
- Menu - Edit - Convert to Profile
- Set Destination Space to sRGB IEC61966-2.1 - Gamma 2.2. Or alternatively, to Adobe RGB (1998) - Gamma 2.2
Now the effect of our "enhancement" is also reflected in the shape of the histogram.
Final judgement
Anyway, I still don't like the resulting image. What to do? Currently the only layer I can manipulate is the Multiply layer. But reducing its opacity just makes the image even lighter. Change the mask? Forget it.
To make the image darker, I see three options:
- Create an extra darkening curve. (Levels would suffice as well.)
- Copy the Multiply layer (without the mask!) and reduce opacity until the result looks OK. At about 40%, the image looks how I want it to look.
- Restart the whole procedure and start with a higher gamma value to reduce the lightening effect. I used the 1.8 button from the False Profile plug-in and redid the whole procedure from there. Now again the result is good enough for my taste.
See figure 7 for the three results.
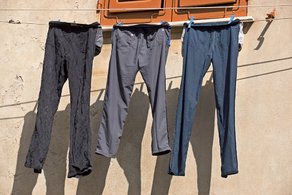


Figure 7. Three final versions, resulting from the three darkening options
The three versions are not exactly equal, but equivalent for all practical purposes. All three fulfil the requirements of the job: to bring light and dark areas closer to each other without emphasizing details too much. But the way to get there was uneven to say the least.
Let me summarize the disadvantages of the FP/M process as far as I experience them:
- It's not fully automated, some manual steps are always required: fill and blur the mask plus convert back to the default gamma
- After executing the procedure, quickly comparing before and after is not possible unless extra work has been done beforehand
- Looking at the histogram is misleading unless one reconverts to the default gamma
- It is not easy to predict which gamma value will lead to a good end result
- Once it's done, not much finetuning is possible, except by extra manual work
Don't understand me wrong, the three results of figure 7 are fine. I am not doing a quality assessment; I am commenting on usability aspects. The method is not bad, just cumbersome. In my opinion, it doesn't fit well in a workflow that is supposed to be efficient and speedy.
NOTE. Since June 2018, the PPW Panel (version 5) contains an action called "Two Sides". It comes in the "My Own Actions" subpanel. Two Sides can serve as a quick-and-simple alternative for the False Profile procedure. If you don't use the panel, this action is also available from the "Downloadable Actions" page of my site. Feel free to download and use it.
Gerald Bakker, 15 Oct. 2015
Picture Postcard Workflow