Bit Depth part 3: 32-bit, HDR and tone mapping
A refresher about dynamic range
My previous article in the Photoshop by the Numbers series introduced the mechanics of 32-bit color coding. Somewhere in that piece, I loosely defined the concept of a “stop”. In the context of digital imaging, one stop simply means: twice as much, or twice as little, light. Light one candle in a dark room, register the amount of light, then light a second one, and you see one stop more light.
A typical monitor supports roughly 8 stops of dynamic range. From black to white, eight times a doubling of the amount of light. Detail is available within these limits. Anything lighter than white remains the same white. Anything darker than black remains black. Detail outside the dynamic range of any device – a monitor, a scanner, a camera, a printer – is lost.
Stops are a common way of defining dynamic range. The dynamic range of anything able to register or show images is the difference between the lightest possible and the darkest possible. Simply said: the difference between white and black.
The sensor of a good camera – say, a modern DSLR – can record more than 8 stops, likely something between 10 and 12. Still a lot less than what the human eye can perceive, which is estimated to be some 20 stops. We may clearly see detail and color in a natural scene, where the camera registers a lot of blacks and whites.
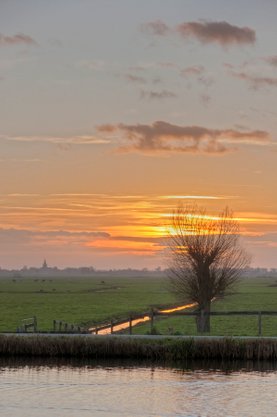
HDR landscape
The photographer steps in
Such high dynamic range scenes present a common challenge for photographers: they want to record and reproduce them, with full detail and color everywhere, from the lightest to the darkest areas. The camera probably can’t do it in a single exposure: either highlights are blown out, or shadows are plugged. The solution: make multiple exposures, each capturing detail in areas of different lightness levels. Photoshop or some other dedicated tool can merge these different exposures so that detail is retained everywhere. As we’ve seen, the standard 8-bit dynamic range (8 stops!) is not enough to hold all this highlight and shadow detail. We need more. So this is where 32-bit coding can be employed.
Usually I don’t provide tutorials, but here is one. Assume you have multiple different exposures of a scene and want to merge them into one 32-bit image file. See figure 1 for an example of this, three images just raw processed without further enhancements.
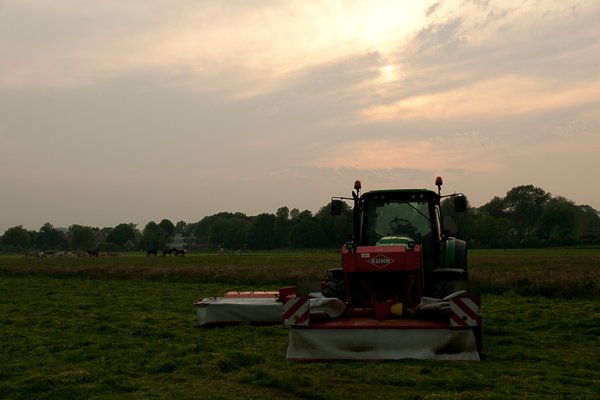
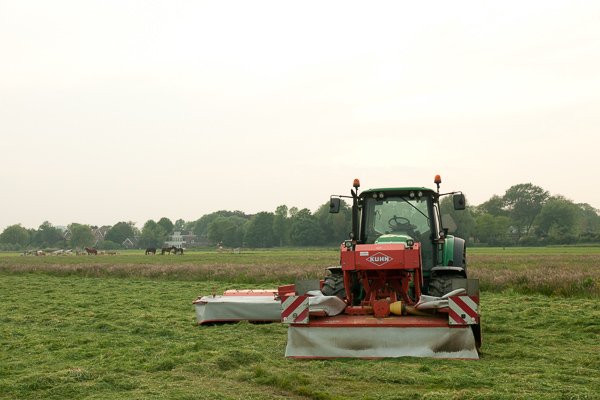

Figure 1: Three exposures of one scene
Here is how to proceed:
- Open Photoshop and from the menu: File – Automate - Merge to HDR Pro…
- In the dialog that is presented, click the Browse… button
- Select and add your image files
- If the exposures were not made from a tripod, select “Attempt to Automatically Align Source Images” – otherwise, switch it off
- Hit OK and Photoshop starts to merge your exposures
- Now Photoshop presents an intermediate window titled “Merge to HDR Pro”. Move the slider below the histogram until you like what you see – note, this doesn’t impact the actual 32-bit image, only how it will look. Mode: 32-bit. Click OK again
- Now you have one 32-bit image file open. See figure 2 for how it looks for the example image
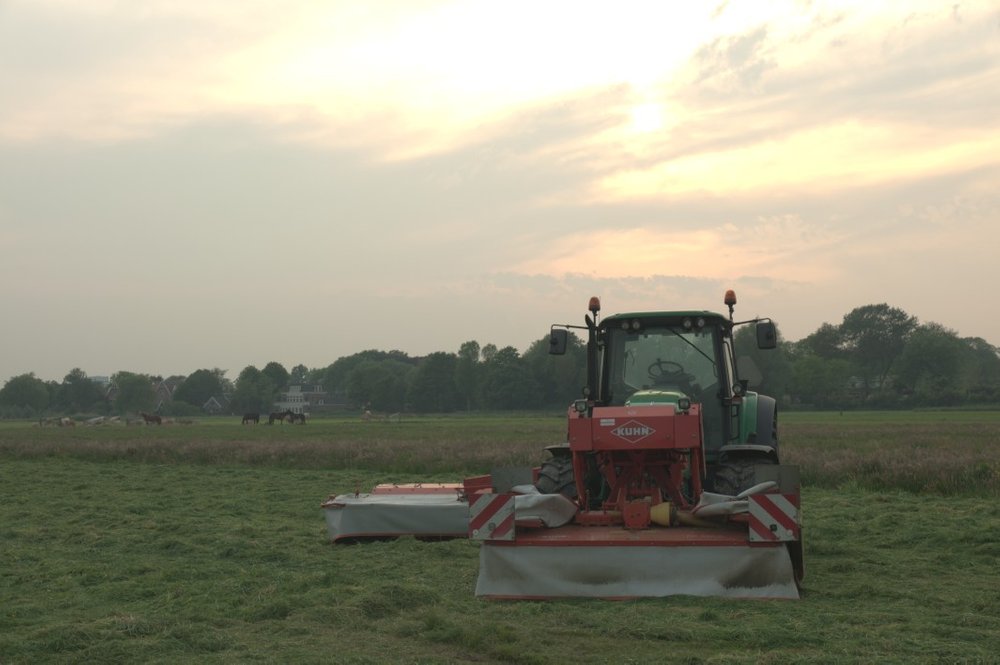
Figure 2: Photoshop's representation of the 32-bit file
The numbers of 32-bit
What you see in figure 2 is of course a crippled representation of the 32-bit file. After all, the monitor is still 8-bit. Note the large blown out white area in the top of the image: believe it or not, it is full of detail. To check that, open the Info panel and set sampling to 32-bit (see figure 3). Now move the cursor over the white areas. All three of R, G and B are higher than 1, but different values everywhere. The detail is there, only you don’t see it.
Now that we are looking at RGB values, let’s search for the lightest point of the 32-bit image. Usually, one would do that by using the Threshold adjustment, but that’s not available in 32-bit. Instead, I had to open the darkest of the three original images and search the lightest point there. I did that and arrived at a point right of the middle of the white area. Similarly, I searched for the darkest point in the lightest version and found it at the tractor’s right tire. See figure 4.
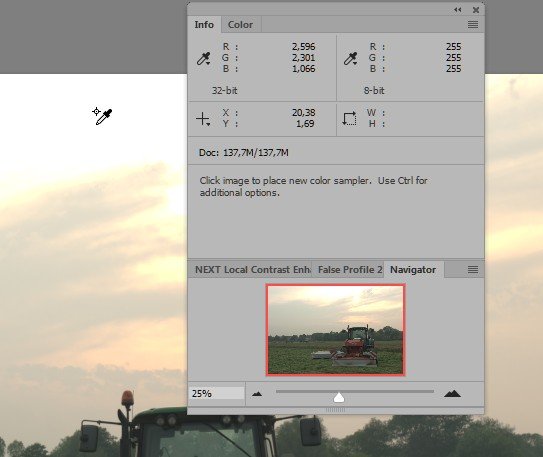
Figure 3: Info Panel on the white area

Figure 4: Info Panel for the lightest and darkest points
In the merged file, the lightest point measures RGB 3.532, 3.605, 1.676. That’s not white but yellow, but a few stops lighter than the monitor’s white.
The darkest point is 0.004, 0.004, 0.003. Note that Photoshop does not introduce negative numbers when it creates a 32-bit HDR file like described above. (As I explained in the previous article, negatives are certainly allowed. We could introduce them by all sorts of adjustments.)
Back to 8-bit
Right. So now we have an image that contains the scene’s full dynamic range, but… it doesn’t show well on the monitor, it can’t be sent to a print lab, it can’t even be saved as a JPEG. In order to make it displayable or printable, obviously it must be converted back to 8-bit. All these extra stops of lights and darks must be squeezed into values between 0 and 255. Unlike converting between 8-bit and 16-bit, it is not straightforward how to turn a 32-bit image back into 8-bits. And the reason is… the high dynamic range.
Let me explain why. An obvious, straightforward way to compress the full dynamic range of the scene into 8 stops would be to invoke a Levels adjustment and move the Output Whites slider left until the RGB values of the lightest point of our image have become 1.0 or less. (Remember that the 8-bit maximum value 255 corresponds to 1.0 in 32-bit.)
I just did that, see figure 5 for the Levels adjustment and figure 6 for the resulting image.
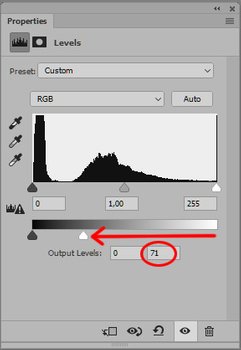
Figure 5: Levels adjustment trying to bring the image back to 8-bit range
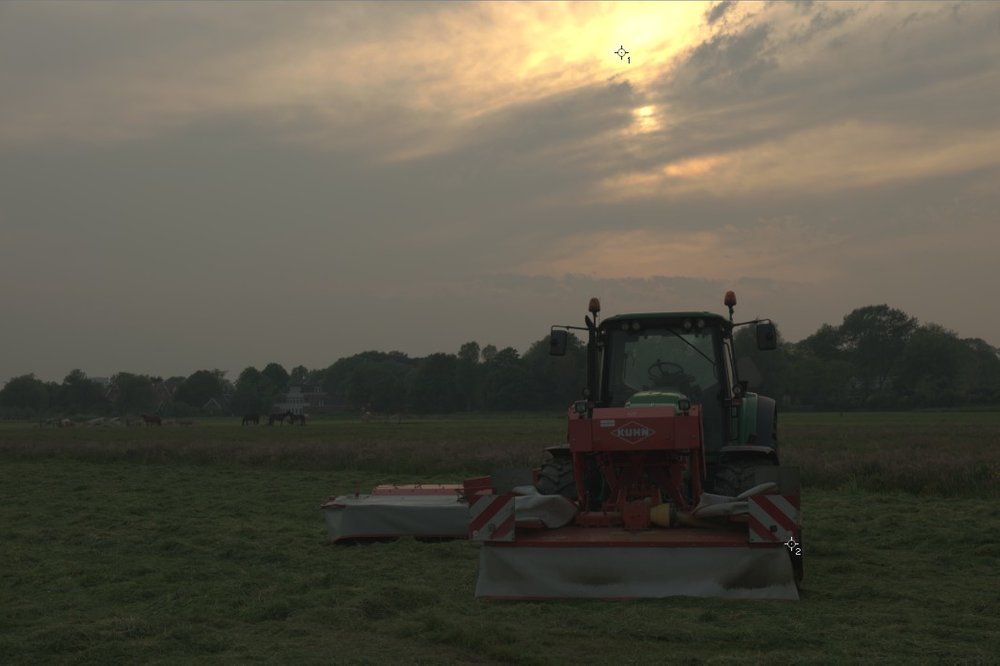
Figure 6: The resulting image
This doesn’t look good, does it? Forcing the highlights into such a limited range turns the photo into a dull drabness. The whole image is flattened, leaving hardly any detail in the shadow areas. All pixels move closer together, resulting in a lifeless whole. Even after lightening the image it still looks boring. We need something better. A conversion that compresses global contrast into the limited range of 8-bit coding, but somehow preserves local contrast.
Tone mapping
What we are searching for is called tone mapping. Simply said, tone mapping is the process of redistributing the tonal values of an image so that detail (color and contrast) is not flattened, but brought out where possible. In theory, the aim is to reproduce what a human has observed. In practice though, many tone mapping algorithms go much further and result in an unnatural, surrealistic look. Shadows/highlights procedures can be seen as simple implementations of tone mapping, but more advanced procedures are of course available and quite popular.
Starting from our 32-bit image, let’s look at the options that Photoshop provides.
Go to the menu and: Image – Mode – 8 Bits/Channel. Instead of just converting, Photoshop shows a big popup window called “HDR Toning” where seemingly a lot of information can be entered (see figure 7).
Well… that depends.
Click the Method drop-down and note that four conversion methods exist. The one with the many options is the default (Local Adaptation), the others either have no options at all or just a few. Let me try to explain the methods, in the order in which they appear.
- Exposure and Gamma – Bases the conversion on manually entered values of Exposure and Gamma. Exposure 0 and Gamma 1 together mean: no change (i.e. any value above 1.0 will be truncated to 255). A positive exposure will lighten the image – generally not a good idea because a good part of it is already lighter than what 8-bit can hold. Lowering Gamma decreases contrast; darks and lights are brought closer together, but local contrast is also diminished.
- Highlight Compression – Rather similar to the Levels adjustment that I suggested above, however it does attempt to give more weight to the darker areas of the image. The result is still quite flat though. See figure 8 for the result in our case.
- Equalize Histogram – Tries to evenly spread out the image’s tonal levels. In our example image, this has a beneficial effect because the dark areas have very limited tonal range. The equalization succeeds in restoring some contrast in the bottom half of the image. See figure 9.
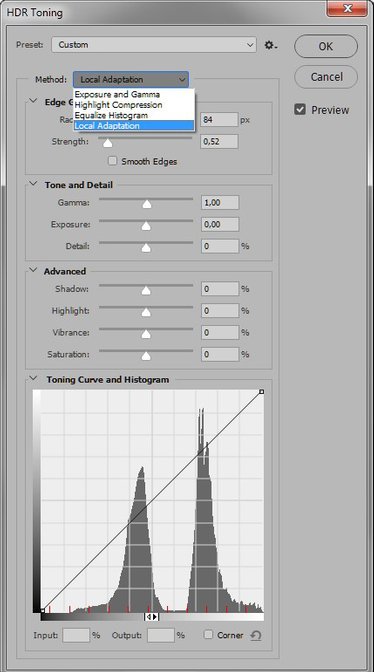
Figure 7: Photoshop's HDR Toning dialog box
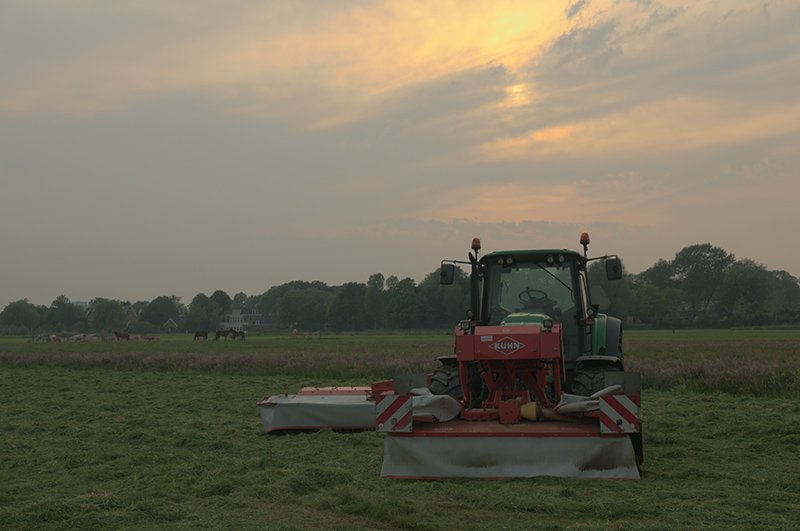
Figure 8: Result of Highlight Compression method
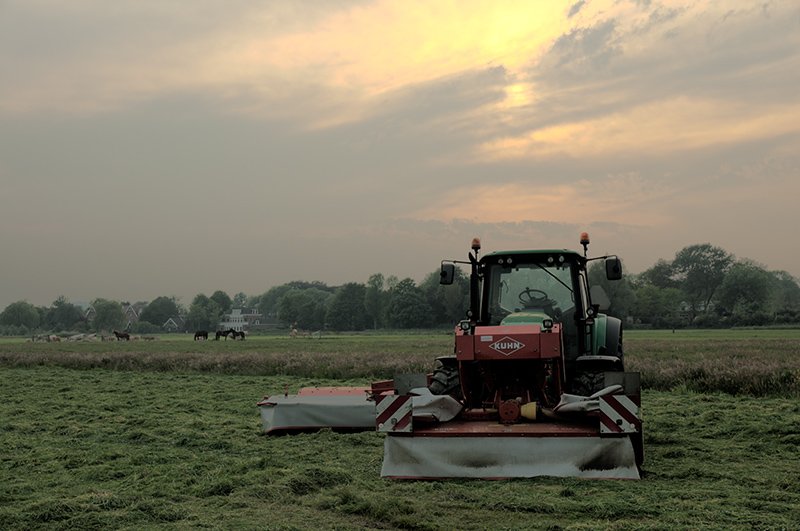
Figure 9: Result of Equalize Histogram method
- Local Adaptation – This is the method with all the options, usually preferred as it gives maximum control. The idea is to enhance contrast on local basis, as a countermeasure against the loss of global contrast. It requires a bit of trial and error to get the optimal values for the desired look. Extreme results are certainly possible. See figure 10 for an example.
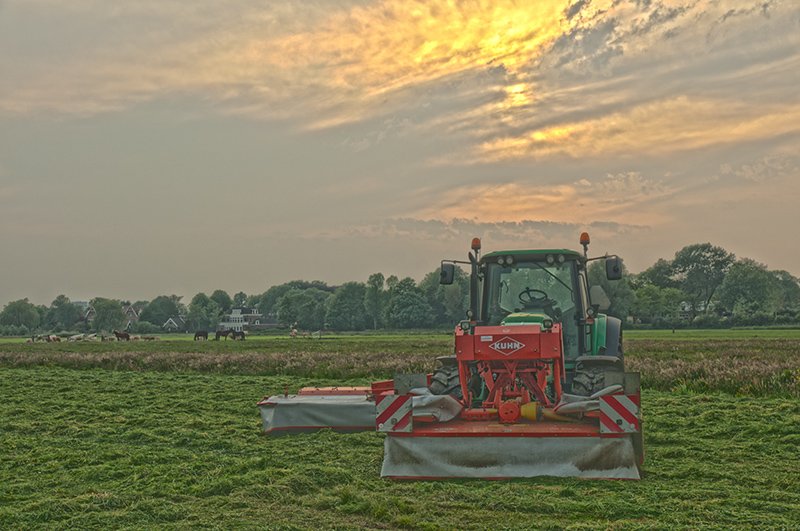
Figure 10: Possible result of Local Adaptation method
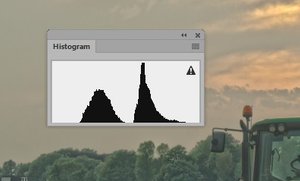
Figure 11: Histogram of figure 10
Interestingly, images like figure 10 are usually referred to as “High Dynamic Range” but in fact they are the results of extreme tone mapping. The histogram that belongs to this very example (figure 11) shows that the dynamic range of this image is in fact greatly reduced to mainly a lot of midtones.
Here is something to think about. Imagine we start with one of the flatter versions, say figure 8. It’s in Photoshop, 8-bit and ready for further processing, right? What about giving it a rather aggressive PPW treatment? Can we make it look better than figure 10 or not?
Gerald Bakker, 29 April 2017
Related articles

Photoshop by the Numbers
