Channels part 2: Channel Mixer and Calculations
Numbers, numbers...
The previous article in the Photoshop by the Numbers series was an introduction to Photoshop’s Channels. Important as channels are for good understanding of Photoshop’s mechanics, the article did not contain many numbers. To compensate for that, I added a small paragraph called Channels by the Numbers which, admittedly, wasn’t the most interesting part of that piece.
The current article will change that. The Channel Mixer adjustment is full of numbers. And Calculations… how could that concern anything else than numbers? So let’s go!
Channel Mixer
Channel Mixer is an adjustment or can be invoked as an adjustment layer. It is accessible from the menu, Image: Adjustments – Channel Mixer (but only if the current layer is a pixel layer), or from the Create new fill or adjustment layer on the Layers panel. It can only be applied to a layer, not to a mask or a channel.
What the Channel Mixer does, in a very short description, is: recalculate every image’s color channel from the existing ones. Say, an image is coded in RGB. The Channel Mixer then allows a user to recompose the Red channel as a combination of all three – something like: construct a new Red that is 80% of the existing Red plus 20% of the existing Green plus 20% of the Blue. As you see, the total does not have to be 100%.
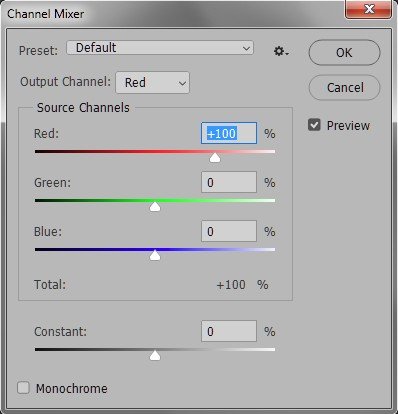
Figure 1. Channel Mixer default appearance
Tools and tiles
Better have a look at what the Channel Mixer adjustment panel looks like. Figure 1 shows it, in its default appearance. The panel effectively represents three formulas (or four if you are working in CMYK). Each formula can be revealed by choosing one channel from the Output Channel dropdown. This channel gets its new value assigned as specified by the four sliders below it.
In figure 1, the output channel is Red. In the default setting, the four sliders are:
- Red 100%
- Green 0%
- Blue 0%
- Constant 0%
The percentages denote how much of each channel we put in the mix. Constant means: make the target channel lighter (positive values) or darker (negatives) by the given percentage.
Obviously, Red +100 and 0 on all other sliders is exactly the same as Red. Source and Target are the same, so nothing changes in this case.
Now let’s add some of the Green to the formula. Change the percentage on the second slider (Green) to 20%. At first thought, you might expect the image to get greener, but no. The target of this change is the Red channel. We make the Red lighter by adding some of the Green to it. Hence, the image gets redder. To be precise, it gets more redder where the Green component is light, and less redder (but still redder) where the Green is dark. Only where the Green is black, the new Red will be the same as the original one.
By now it will be clear that only color channels can be used in the mix. It is not possible to mix alpha channels. And last but not least, Channel Mixer is available in RGB and in CMYK, but not in LAB neither in Grayscale.
Going monochrome
Somewhat interesting is the Monochrome button. See figure 2.
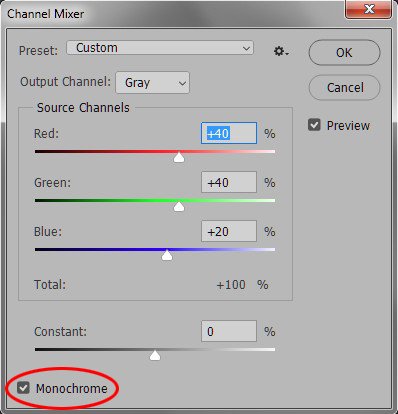
Figure 2. Channel Mixer "monochrome"
The image turns to grayscale. Target channel is Gray (what else?), and the four sliders function as they do for color images. The actual conversion depends on the color mode we're currently in:
- In RGB, the default percentages are 40 and 40 for Red and Green, and 20 for Blue. These figures are surprising, because the ratios for standard grayscale conversions are 30, 60 and 10 for the R, G and B resp. Why it’s different here, well, we’ll probably never know.
- In CMYK, it's completely different. The conversion is set to whatever percentages were active when the Monochrome button was clicked. In the window, the current Output Channel is replaced by Gray. This way of working allows a user to prepare a version with optimal contrast and then switch to monochrome.
The result of applying Channel Mixer with the Monochrome option is still an RGB- or CMYK-coded image. In RGB, all channels are forced equal. In CMYK, the result of the conversion is copied into the Black, and all other channels are made white. But all channels are still there and can be adjusted separately. The image could thus be processed further e.g. to a sepia or duotone version.
I personally don’t think Channel Mixer provides a powerful way of converting to black/white. More versatile is the Black & White adjustment, which allows individual colors to be targeted in the conversion.
A Channel Mixer example
If you are curious about a practical use of the Channel Mixer, here is an interesting and maybe useful application.
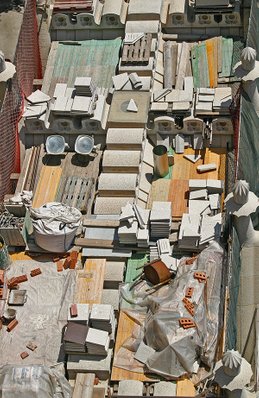
Figure 3. Example image containing blue shadows
Figure 4. The black channel
Given a photograph taken in sunlight, containing both sunlit and shadow areas. Figure 3 is an example. Note the blue tinge in the foreground shadow areas. One would prefer to make the darkest areas of the image warmer. Here is a method.
1. Convert the image to CMYK. Menu: Image – Mode – CMYK Color. If you get a profile warning, click OK.
2. Add a Channel Mixer adjustment layer.
The idea now is to make the darkest parts of the image warmer, meaning less cyan and more yellow. The good thing about CMYK is that the “darkest parts” are nicely targeted by the Black channel (figure 4).
3. On the Channel Mixer Properties channel, click Output Channel Cyan. We want the darkest parts of this channel to get lighter, so we subtract some of the Black channel from it. So: move the Black slider to -40.
4. Now choose Output Channel Yellow. This channel must get more weight in its darkest parts, so add +40 of the Black to it.
5. The result may be overdone, but commit anyway. Now reduce opacity of the Adjustment layer to taste.
6. Flatten and convert back to RGB.
Ready! Figure 6 shows the result (opacity left at 100%), next to the original.
Figure 5. Original image (same as figure 3)
Figure 6. Image processed with Channel Mixer procedure
Calculations
Calculations is quite different from Channel Mixer, even though the two share some similarities. Calculations must not be seen as an image adjustment, an action that modifies an image. Instead, it combines two channels (or even three, if we include the Mask in the count) and generates something new: a channel, a document or a selection.
Look at figure 7 for an example.
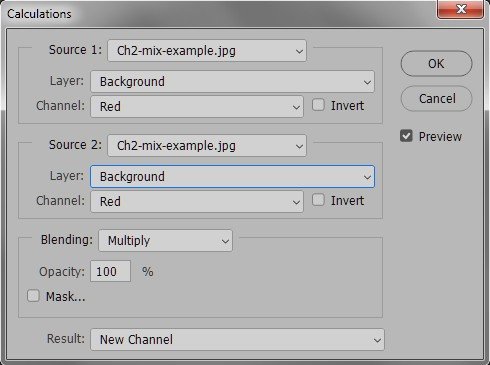
Figure 7. Calculations window
Calculations takes two operands (here called Sources): both channels, or Gray which is a standard Grayscale conversion of the given layer. The user is free to specify a different layer for each operand, and even a different document provided that it has the same pixel dimensions. The two sources are specified in the blocks called Source 1 and Source 2.
Calculations then combines the two channels using the blending mode as given in the Blending block, with the specified opacity. Optionally, the operation can be applied with a mask, which again is chosen from the available layers/channels.
The result is stored as either of the following:
- a new channel – called Alpha X where X is counting up from 1
- a new document – called Untitled-X where X is counting up from 1
- a selection in the current document
Some critical remarks
In my opinion, Calculations is, well, a bit clumsy.
First, every operand is a grayscale. The result is always a grayscale. No real color operations are possible. Good enough if you want to create a selection or a new channel which is some combination of existing channels. Not if you want to create a new document.
Second, Calculations allows a user to make a selection, a new channel, a new document... but not a new layer. Isn’t that awkward?
Third – that’s a longer story. Given: two operands and a blend mode (operator) plus opacity, what calculation would one expect? I’d say: apply Source 2 on Source 1 with the specified blend mode, using the opacity as a percentage. Here is an example. See figure 8.
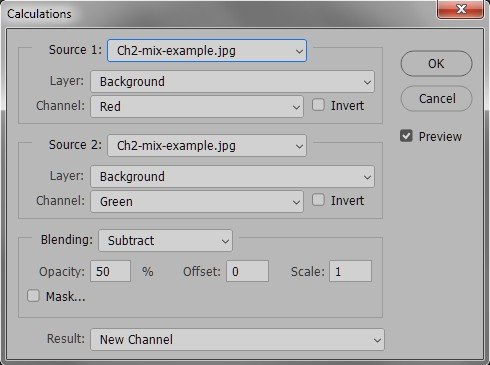
Figure 8. Example Calculations with Subtract blend mode
Source 1 is the Red channel. Source 2 the Green. Blend mode Subtract, Opacity 50%. (Ignore Offset and Scale for this example.) Isn’t that like: pick the Red and subtract 50% of the Green from that?
Well, not so. It’s the other way round. 50% of the Red is subtracted from the Green. Given the design of this window (from top to bottom: Source 1, Source 2, Blend/Opacity), I would absolutely expect the reverse. I had to try a few examples until I was really convinced.
Okay, most blend modes are symmetric, meaning that swapping the two sources does not matter. Subtract is an exception. But Opacity is only insignificant if it is 100%. For any other value: remember that it is applied to Source 1 and not to Source 2.
I don’t have an example of Calculations. In the light of the previous critical notes, I don’t find it useful at all. I think one might say that it is surpassed by a far more powerful and interesting command: Apply Image. That will be the subject of the next article.
Gerald Bakker, 20 Sept. 2018
Related articles
Photoshop by the Numbers
