The Unsharp Mask filter part 2: The parameters in practice
The three parameters
Photoshop's Unsharp Mask (USM) window asks a user to enter three parameters: Amount, Radius and Threshold. The meaning of these parameters is, on a theoretical level, explained in a previous article.
Now it’s one thing to understand the theory behind USM, another to know how to actually invoke it for best results. Which values of Amount, Radius and Threshold do the best job for a given image? Let me emphasize beforehand that no general consensus exists about this. Personal taste plays a role. The preference of one person may be judged as overdone or too weak by another. The same is true for artistic considerations. A stronger sharpen gives a different look: crunchy, crisp. This may work for one image, and destroy another.
In conclusion: don’t expect definite directives from me, or from anyone. But some guidelines can be given. After all, it’s all about numbers…
Radius for print
Remember from the previous article that a sharpening effect can be convincing at 100% but artificial and not effective at all at 500%. This may be one of the most important lessons about sharpening. A sharpening can only be effective on the condition that it’s not obvious. As soon as halos become visible, the user has gone too far and the end result may look worse than the original.

Hotel
The simple goal may thus be: go as far as you can without giving the trick away.
So the first question is, what’s the largest radius that a viewer will not notice? The answer depends on things like viewing distance and acuity of vision, but nevertheless there is a rule of thumb that halos can be around 0.01 inch wide (0.25 mm). Assuming a 300 ppi print, that makes a 3-pixel halo. Note that this is 3 pixels on both sides of an edge.
With this useful guideline comes the first source of confusion. Which value of Radius must be entered on the Unsharp Mask window to get 3-pixel halos on each sides of edges? Turns out: this is not a trivial question. The obvious answer would of course be: 3. But no, that’s too simple. Let’s look at what happens.
Create a similar example that I used in the previous article. One half of an image filled with dark grey (RGB 75,75,75) and the other half with RGB 175,175,175, light grey. Apply USM with Amount 200%, Radius 3 and Threshold 0.
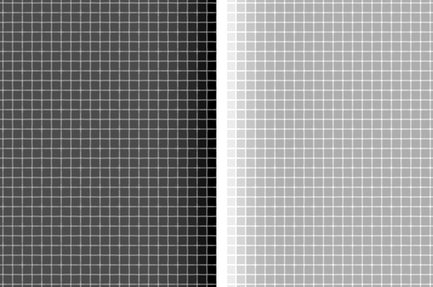
Figure 1. The effect of USM with Radius 3, highly enlarged
The result is shown in figure 1, enlarged to 1200% so the individual pixels are visible. How wide are the halos? Hard to say. Counting from the edge, as many as 7 pixels on each side have been affected by the filter. Photoshop doesn’t create hard X-pixel halos, but it smears them out into the surroundings. That’s good because it looks good, but it leaves a mathematician searching for exact numbers in doubt.
I did an internet search, and found no general rule. The most useful piece of information that I found is a radius calculator on the following page: https://www.cambridgeincolour.com/tutorials/image-sharpening.htm, not far from the bottom. For 50 cm (20 inch) viewing distance and 300ppi print, the estimated radius would be 2.4 pixels. For 25 cm, it’s 1.2 pixels. Well, if you really want a number, make it 2 pixels. But be aware that many factors impact the optimal radius. More about that later.
Radius for screen
On the screen, not unsurprisingly, a sharpen radius can be about the same: 0.01 inch. How many pixels does that correspond to?
Obviously, it depends on your screen resolution. Some quick examples. An HD monitor measures 1920 pixels horizontally. Should the monitor be 21 inch wide (meaning about 24 inch diagonal, which is what's usually specified), the pixel dimension is 1920 / 21 = 91 ppi. Every inch contains 91 pixels in both directions.
A typical 4K monitor, 28 inch diagonal, measures 3840 horizontal pixels over about 24 inch. This results in a ppi value of 157.
In the first case, halos could measure about 1 pixel, in the second 1.5. A proper Radius value in the USM dialog could then be somewhere between 0.5 and 1.
Figure 2 shows the 2-radius and 0.5-radius versions of the example image, both displayed at 100%.


Figure 2. The example image as described in the text, sharpened at 2 pixels (left) and 0.5 pixel (right).
In reality, it’s not so simple
The guideline to use a sharpen radius of 2 pixels for print and 1 or 0.5 pixel for screen is way oversimplified. Many factors play a role, apart from the simple “what halo width can I get away with”. Let me list them here.
1. For print output, the correct resolution must be set for the output device before determining the sharpen radius. Imagine a 24MP image (6000x4000 pixels) that we want to print on 6x4 inch. Assuming the print resolution to be 300ppi, that would require 1800x1200 pixels for the print. That’s a downsample to 30% in both directions. Imagine we first apply a 3-radius sharpen and then do the resize, the effective radius will be less than 1 pixel.
Instead, first downsize and then apply the proper sharpen.
2. The same can be stated for screen output. First downsize to how the file is displayed, then determine the sharpen radius. It follows that sharpen settings cannot be properly judged as long as an image file is still being zoomed in or out in Photoshop. The correct procedure is: first resize for output, then zoom in to 100%, then sharpen.
3. Viewing distance plays a role. The 0.01 inch is based on a normal viewing distance of about 50 cm (20 inch). This might imply that a larger radius is acceptable for larger prints, as these are normally viewed from larger distances. However, I would be very cautious about this, because who knows how your prints will ultimately be viewed?
4. I noted that a sharpen radius can be higher for high-resolution screens, because pixels are smaller. But what if the image goes to the web and we don’t know on what screen resolution it will be displayed? (Note, the display medium could even be a phone, for which the numbers are again different.) Of course, there is no definite answer to that question. What looks well-sharpened on one monitor may look subpar on another. The best advice is to keep the radius conservative. Too little sharpening may give a soft result, too much can ruin an image.
5. In almost all photographs, dark sharpening halos can be stronger than light ones. That’s a surprising fact, but it’s clearly visible when you pay close attention. See figure 3 for an example. Left, an original, middle and right both sharpened with exactly the same sharpening settings - the middle version shows the dark halos only, the right version the light ones only. Note how much more visible the light halos are. I would say that some more dark halos would be okay, but the light ones should better be dimmed a bit. A good sharpening procedure makes a split and applies two different sets of USM values.
Figure 3. Original image, version sharpened for dark halos only, and one for light halos only.
6. It’s obvious that high radius sharpening can destroy small image detail. It’s also not difficult to realize that small radius sharpening can amplify noise. When either of these happen, an adjustment of radius may be in order. The following paragraph covers this.
Amount
As far as I know, there is no straightforward algorithm for Amount as we had it for Radius. The actual choice for Amount is mainly determined by artistic judgement, image characteristics and personal preference. As a general guideline, I find 200% a good starting point, but always adjust to taste, sometimes arriving at a larger value, sometimes at a smaller one.
However, there is one thing worth mentioning here. Radius and Amount to some extent compensate each other. Making one smaller allows the other to become larger without the immediate risk of oversharpening. This comes in handy for the image categories that were mentioned under bullet 6 above.
First, when it’s important to retain fine texture, a good strategy – even when preparing for print – is to set radius at a lower value and increase amount instead. See figure 4 for an example. Left is the original, middle sharpened at 4 pixel 75%, right at 1 pixel 300%. In each case, Threshold was left at 0. Note how much better the texture is enhanced in the right version.

Figure 4. Left, original. Middle, sharpened with high radius. Right, with low radius and high amount.
Second, the counterpart, is a noisy image. In a way such an image contains a lot of fine texture, but it’s texture that we don’t want to see amplified. Figure 5 is the example, sharpened in two different ways, using the same parameters as in the previous example. The preferred version would be the middle one, although more should be done to reduce the noise.


Figure 5. Left, original. Middle, sharpened with high radius. Right, with low radius and high amount.
Portraits can be seen as a special category as they are a bit of both: human skin contains texture that is not noise, but in most cases should not be amplified either. Don't sharpen a portrait too aggressively; better keep amount on the low side and radius a bit higher.
Threshold
The purpose of the Threshold parameter is to limit sharpening to stronger edges, and leave weaker ones alone. Foremost, this avoids sharpening noise. The assumption here is that noise consists of subtle dark/light transitions, and real detail is more pronounced. This is of course not quite accurate, but setting a positive threshold works nevertheless. See figure 6 for an example. Left: sharpened at 2 pixels 200% with Threshold 0, right: sharpened similarly but with Threshold 10.

Figure 6. The difference between Threshold 0 (left) and 10 (right).
Like for Amount, there is no formula to determine an optimal Threshold value for a given image. It’s again up to the retoucher’s personal preference. Like for Radius however, there is a relationship with Amount. Any positive value of Threshold will reduce the overall sharpening effect. Hence, the larger the Threshold, the larger Amount can theoretically be.
Final words
There is no doubt that sharpening is effective. The difference between sharpened and not sharpened is – for almost all images – significant. Hence, it makes sense to study sharpening techniques and, as above, examine how the parameters of the Unsharp Mask filter should be set for optimal results.
Yet, it is important to note that the difference between a good sharpen and an excellent sharpen is usually not significant. Try it if you like: print two versions of the same image: one sharpened with the USM defaults, one with the best possible sharpening procedure that you know. On screen, zoomed in to 100%, you may notice a considerable difference, but in print that difference may be hard to perceive. And even if the comparison would reveal one winner, ask yourself if the other contestant, when judged in isolation, would get anyone to comment that it was not optimally sharpened. Probably not. If you want top quality results, better spend time on other image aspects.
Stupid as I am, I will not follow this advice and write a few more articles about sharpening. Stay tuned.
Gerald Bakker, 1 Jan. 2018
Related articles


Photoshop by the Numbers
