The Unsharp Mask filter part 4: Why "Unsharp Mask"?
Sharp or unsharp?
Now that we’ve come to the last article about Unsharp Mask, it’s time to ask why the filter is called Unsharp Mask? Why not Sharp Mask or just Sharpen? Admittedly, there is another filter that is called Sharpen but that’s just a cursory and inferior variant of the far more powerful Unsharp Mask filter.
Unsharp Mask is based on a technique that was already used in the darkroom, long before Photoshop saw the light of day. Many websites tell you that its mechanics come down to sandwiching the original with an inverted, blurred copy, the “unsharp mask”. The process is usually explained in just a few sentences; I suspect many readers are left with more questions than before they read it.
The truth is: an application of Unsharp Mask (USM) is fully reproducible by using no other filter than Gaussian Blur (GB). This fact may be less commonly known, but I have to admit that I’m not the first one to note this. To be precise, I am aware of two places where this fact is mentioned:
- Dan Margulis, in an article from 2005, presents a 23-step action in https://www.ledet.com/margulis/Makeready/MA69-Life_on_the_Edge.pdf - see the pink box on the second page. Presumably this action formed the basis of the conventional sharpening layers of the PPW Sharpen action. The aim of this procedure though is not to exactly duplicate USM, but to provide a good sharpen action using the GB filter only.
- Davide Barranca does show how USM in fact uses GB, but he only presents a layer stack that accomplishes this, without further explanation. See http://www.davidebarranca.com/2012/09/decomposing-sharpening-part4-the-lab-way/, under the heading "Unsharp Mask uses Gaussian Blur".
Unsharp or sharp mask?
In the current article, I want to show the exact connection between USM and GB and explain every step. You could see it as a tutorial, but because it doesn’t enhance your image in any way, I decided to make it a Photoshop by the Numbers article. Tutorial or not, it will hopefully provide some insight!
Into action
Open any image in Photoshop and duplicate it. (Menu: Image - Duplicate...). On the first instance, duplicate the background layer and call the new layer “USM”. On it, apply Filter – Sharpen – Unsharp Mask and enter the following parameters:
- Amount 100%
- Radius 2.0 pixels
- Threshold 0 levels
This will be used as reference. See figure 1 for a comparison of before and after.


Figure 1. Fragment from original and sharpened with given parameters
Don’t touch this version any more and activate the second one, still in its original state. I will now show how to regenerate the sharpened image by using the Gaussian Blur filter only.
On the second instance, duplicate the background layer and call it “Original”. Duplicate it again and call the second duplicate “Blurred”. Apply Menu: Filter – Blur – Gaussian Blur to the layer “Blurred” and enter Radius 2.0. (As you may suspect, the GB radius must be the same as the USM radius as applied on the first image.) Set the blend mode of the top layer to Subtract. See figure 2 for the current layer stack and figure 3 for the result so far.
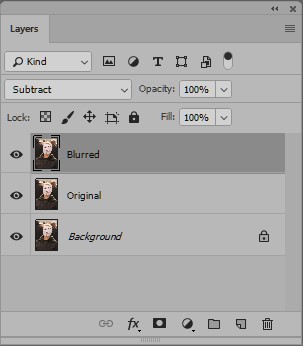
Figure 2. Intermediate layer stack
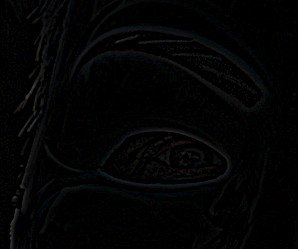
Figure 3. Current state of image
Creating light halos…
We are now looking at a mostly black image, with a number of small light edges and spots. This is an important intermediate state, so let me zoom in on what happened so far. The Subtract blend mode subtracts RGB pixel values of the current layer from what’s underneath. It's underneath minus current. In our case, it subtracts Blurred from Original. Negative values are of course not possible and replaced by 0.
- Where the blurring had no effect, Original and Blurred are equal, so the result of the subtraction is 0, hence we see a black pixel. This is the case in areas without transitions.
- Where the blurring lightens pixels, Blurred has a higher value than Original, so the result would be negative, meaning black again. This happens for pixels that are (in the original image) surrounded by lighter neighbors.
- Where the blurring darkens pixels, the subtraction yields a positive result: hence we see something lighter than black. Obviously this happens where original pixels were surrounded by darker ones.
So the spots and stripes are pixels that get darkened by the blur. Lighter pixels surrounded by darker ones. Remember how the sharpening was done? Lighter pixels surrounded by darker ones got lightened, to make them even more stand out. So let’s apply the inverse of what we just did. In other words, add (i.e. make lighter) what we are now looking at to the original image. That will make our light spots and edges even lighter.
There is a blend mode for adding pixel values; it’s called “Linear Dodge (Add)”. Unfortunately, we cannot set this on the current layer, because it has already been blended in Subtract. But we can make a new layer containing the current state of affairs, and apply Linear Dodge to that.
Back to instruction mode. Create a new composite layer on top of the layer stack and call it “Light halos”. (In Windows, this is accomplished by the keyboard combination Ctrl-Alt-Shift-E.) Set blend mode of this layer to Linear Dodge (Add). Hide the two middle layers Original and Blurred. If you followed all steps correctly, the sharpening effect must be well visible, even though there are only light halos now. See figure 4 for original and current state compared.


Figure 4. Original (left) and sharpened with light halos only (right)
… and dark halos
Can we do the same trick to create dark halos? You bet. But a little tweaking is needed beforehand.
First, hide the Light halos layer and unhide the other layers. Set blend mode of layer Blurred back to Normal. We are looking at the blurred image version again. How to extract the dark halos this time?
Well, dark halos in a sharpened file correspond to darker pixels surrounded by lighter ones. In our Blurred layer, this corresponds to pixels that get lightened by the blur. Remember how we looked at pixels that were darkened by the blur in the first phase of the process? They were revealed by subtracting the blurred image from the original one. So this time, we need the reverse: subtract the original image from the blurred one. Unfortunately, there is no blend mode that accomplishes this… at least, not in the way the layers are positioned now. We have to swap the two layers.
So: move the layer called Original one position up so that is right above the Blurred layer. Set blend mode of layer Original to Subtract. Similar to what happened in the previous paragraph, we now see pixels that are lightened by the blur; all others get black. These lightened pixels are apparently surrounded by lighter neighbors, and thus must be darkened in a sharpening process. The blend mode to use is, guess what, Subtract. Figure 5 shows the layer stack.
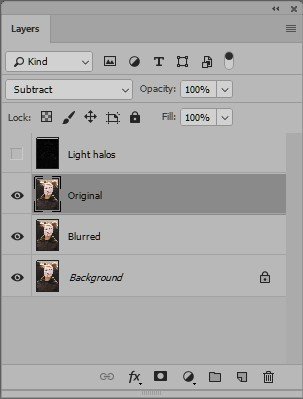
Figure 5. Current layer stack
So here we go – the rest is peanuts.
Create a new composite layer above the layer called Original and call it “Dark halos”. Set blend mode of this layer to Subtract. Remove the two middle layers Original and Blurred: they are no longer needed.
Finished! Now switch between the two open files to make sure they are indeed identical. (If not, you definitely have made a mistake.) If you really want to be sure that the two files are 100% identical, proceed as follows. Go to image version 1 and activate the USM layer. From the menu: Layer – Duplicate layer. Enter As: “USM” and Document: the name of the other open image and hit Enter.
Switch to the second image. Make sure the copied USM layer is added on top of the stack. (If not, move it there.) Set its blend mode to Difference. Any pixel that is not identical to what’s below would show as non-black. I predict that those don’t exist: everything is pitch black and the files are indeed exactly equal. See figure 6 for the layer stack and figure 7 for how the comparison looks.
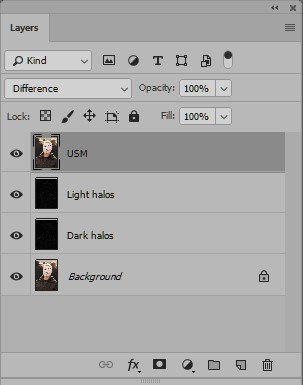
Figure 6. Layers for comparison

Figure 7. Result. This time, really black
Some questions left?
For those who still have doubts, here are answers to some frequently asked questions.
1. Why didn’t we eliminate color shifts this time? Wouldn’t that provide a better sharpen?
A: Because the aim was not to get an optimal sharpen result, but to prove that Unsharp Mask is derived from Gaussian Blur. Both versions in the above procedure suffer from the same color shifts. If you don’t want that, make a composite layer again and set it to Luminosity.
2. Can we obtain the exact effect of a Gaussian Blur by using the Unsharp Mask filter only?
A: Ha. Yes we can! The procedure is similar. I won’t spell it out but leave it as an exercise for the reader.
3. Is the proposition still valid if we change the parameters of the Unsharp Mask application?
A: Almost. Let’s see:
- Change the USM Radius from 2.0 to something else
- Do it for the Gaussian Blur as well. - Change the Amount to something different than 100%
- I thought this could be replicated by either setting opacities of the Dark halos and Light halos layers to the same percentage (if lower than 100%) or by duplicating them and set opacities such that they sum up to the given percentage. But this yields small deviations. Maybe just rounding errors, maybe more computation is involved and it’s not possible at all. - Set Threshold to a positive value
- This requires a more complex procedure. Let’s assume we pick Threshold 5. Starting from the second image, add Solid Color adjustment layers above both of Dark halos and Light halos layers. Color RGB = 5,5,5. Set both to Subtract blend mode and Menu: Layer – Merge down for both. That should do it.
4. Isn’t all this utterly useless theory?
A: Perhaps. Your images won’t improve a bit by the above exercises. What they prove though is that Photoshop’s oldest filters like Gaussian Blur and Unsharp Mask are very simple algorithms. They were designed in a time when computers were very slow and serious image processing took ages. The power for sophisticated sharpening algorithms was simply not available.
And other than that, it’s just a bit of entertainment. For me as mathematician, IT professional and Photoshop user, and hopefully for you as interested reader.
Gerald Bakker, 29 March 2018
Related articles


Photoshop by the Numbers
